Tiny Crochet Flower: 5 Free Mini Flower Patterns for Every Skill Level
A tiny crochet flower is one of the most versatile and rewarding projects in the entire craft. Small enough to finish in under 30 minutes, beautiful enough to transform any project it touches — a well-made mini flower in the right color can elevate a plain blanket into a work of art, turn a simple […]
A tiny crochet flower is one of the most versatile and rewarding projects in the entire craft. Small enough to finish in under 30 minutes, beautiful enough to transform any project it touches — a well-made mini flower in the right color can elevate a plain blanket into a work of art, turn a simple gift into something unforgettable, or become the foundation of a full bouquet arrangement.
In this guide, you will find five completely free tiny crochet flower patterns, each one written for a different skill level and a different aesthetic. Whether you are a complete beginner picking up a hook for the first time, an experienced maker looking for a quick between-project make, or a crafter searching for the perfect embellishment to add to a blanket or garland, there is a tiny crochet flower pattern here for you.
Every pattern in this guide is written in full round-by-round instructions, with stitch counts verified at the end of each round. Key techniques are explained before you need them. Troubleshooting tips are included for the moments when things do not go as planned.
By the end of this article, you will have five patterns you can return to again and again — and a solid foundation for exploring the full flower pattern collection on this website.
Why Tiny Crochet Flowers Are Worth Learning
Before diving into the patterns, it is worth understanding why the tiny crochet flower deserves a permanent place in your pattern library.
They are fast. Most of the patterns in this guide take between 15 and 45 minutes to complete. On a quiet evening, you can make an entire collection of five different flowers. This makes them ideal for building up stock for craft fairs, creating a set of embellishments for a larger project, or simply satisfying the urge to create something finished in a single sitting.
They use almost no yarn. A tiny crochet flower typically requires less than 5 grams of yarn — often far less. This makes them the perfect project for yarn scraps and leftover balls from larger projects. A single 50g skein can yield dozens of flowers in different colors.
They are incredibly versatile. A tiny crochet flower can be:
- Sewn onto a bouquet blanket for a three-dimensional floral effect
- Used as a hair accessory clip or brooch
- Attached to a headband, bag, or hat
- Strung together into a garland
- Glued onto greeting cards or gift wrap
- Bundled into a handmade crochet bouquet
They are the perfect beginner project. Working small pieces in the round with a limited stitch vocabulary is exactly the right way to build the muscle memory and tension control that more complex patterns require. Every tiny crochet flower you make is practice that pays off in every future project.
What You Need to Make a Tiny Crochet Flower
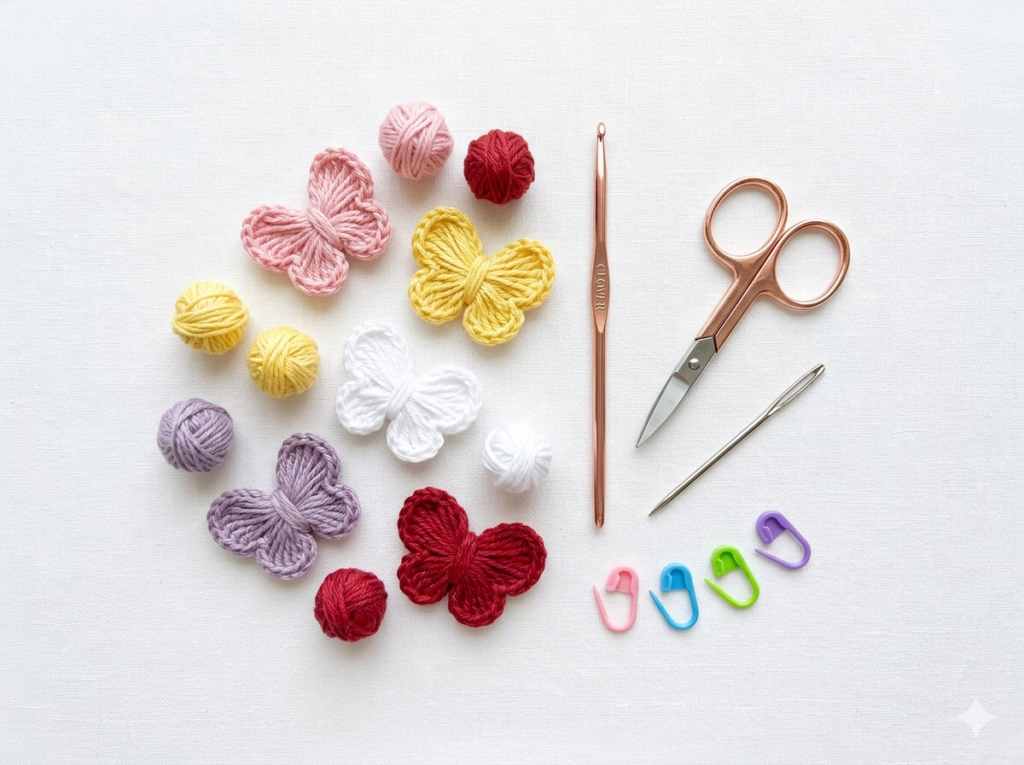
All five patterns in this guide use the same basic materials list. Gather everything before you begin.
Yarn
Any yarn weight works for tiny crochet flowers — the weight you choose simply determines the size of the finished flower:
- Fingering / sock weight (1): Produces flowers 2–3cm wide — perfect for miniature bouquets and jewelry
- DK / sport weight (3): Produces flowers 3–5cm wide — ideal for blanket embellishments and hair accessories
- Worsted weight (4): Produces flowers 5–7cm wide — great for bag decorations and larger bouquets
- Cotton yarn: Gives flowers crisp, defined petal edges — best for detailed patterns
- Acrylic yarn: Gives a softer result — best for flowers that will be handled frequently
For the patterns in this guide, DK weight cotton or acrylic in your chosen colors is recommended.
Hook Size
- DK weight yarn: 2.5mm or 3.0mm hook
- Worsted weight: 3.5mm or 4.0mm hook
- Fingering weight: 1.75mm or 2.0mm hook
Other Supplies
- Tapestry needle for weaving in ends
- Scissors
- Stitch markers (optional but helpful for beginners)
- Pins for blocking if desired
Stitch Abbreviations Used in These Tiny Crochet Flower Patterns
| Abbreviation | Full name | What it means |
|---|---|---|
| MR | Magic ring | Adjustable starting loop |
| CH | Chain stitch | Basic chain |
| SC | Single crochet | Short basic stitch |
| HDC | Half double crochet | Medium height stitch |
| DC | Double crochet | Tall basic stitch |
| TR | Treble crochet | Very tall stitch — creates wide petals |
| SL ST | Slip stitch | Joining stitch |
| INC | Increase | 2 stitches into 1 stitch |
| SK | Skip | Skip the next stitch |
| R | Round | One complete circuit |
| ( ) | Repeat | Work contents the stated number of times |
| [ ] | Stitch count | Total stitches at end of round |
Core Technique: Working in the Round
Every tiny crochet flower in this guide is worked in the round, beginning with a magic ring. If you have never worked in the round before, here is everything you need to know.
How to Start a Magic Ring
The magic ring — also called the magic circle — is the foundation of virtually every crochet flower pattern. It creates a tight, adjustable center that eliminates the gap you get when starting with a foundation chain.
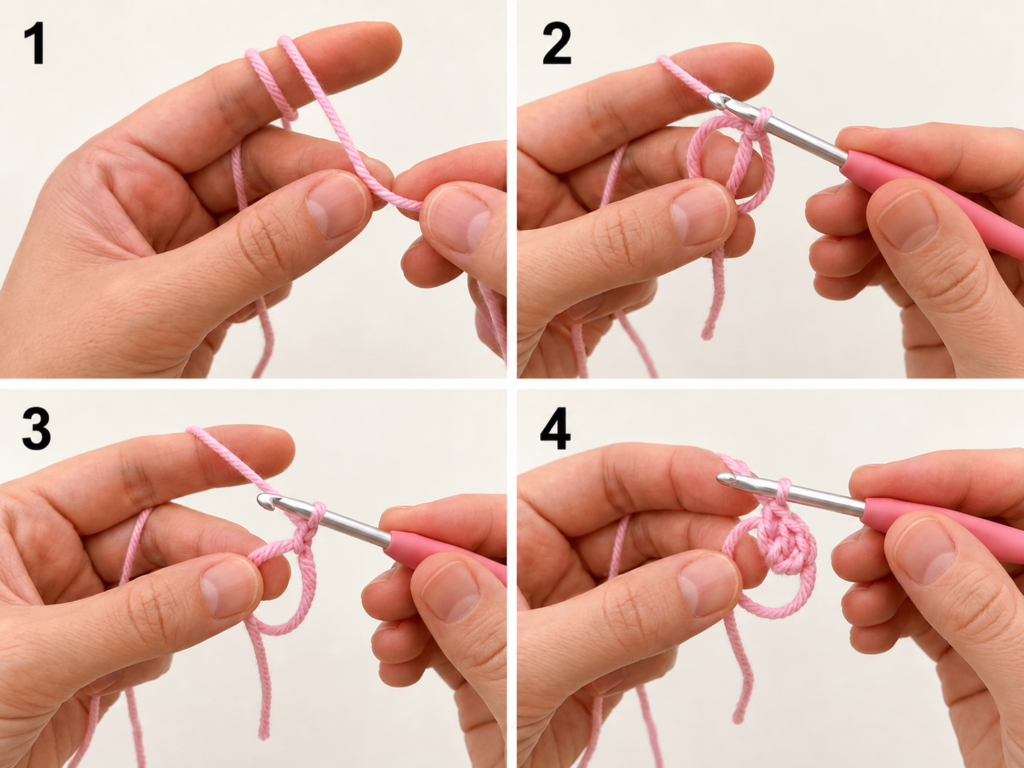
Step-by-step magic ring:
- Hold the yarn tail between your thumb and middle finger
- Wrap the working yarn twice around your index finger
- Insert your hook through both loops on your finger
- Yarn over and pull up a loop — do not pull through yet
- Chain 1 to secure (this chain does not count as a stitch)
- Work your first round of stitches directly into the ring
- When the round is complete, pull the yarn tail firmly to close the center hole
How to Join a Round with a Slip Stitch
Unlike amigurumi (which is worked in a continuous spiral), most tiny crochet flower patterns join each round with a slip stitch. After working the last stitch of a round, insert your hook into the first stitch of that round, yarn over, and pull through both loops on your hook in one motion. This creates a neat, invisible join.
Working Petals in Chain Spaces
Several of the patterns below create petals by working stitches into chain spaces rather than individual stitches. To do this, insert your hook under the entire chain arch — not into a specific stitch — and work your stitches into that space. This gives petals their characteristic open, airy appearance.
The 5 Tiny Crochet Flower Patterns
Pattern 1: The Classic 5-Petal Flower (Beginner)
This is the tiny crochet flower pattern most beginners start with — and for good reason. It works up in under 20 minutes, uses only chain stitch, single crochet, and slip stitch, and produces a clean, symmetrical flower that works beautifully as a standalone decoration or sewn onto any project.
Finished size: Approximately 4cm wide using DK yarn and a 3.0mm hook Skill level: Complete beginner Time: 15–20 minutes.
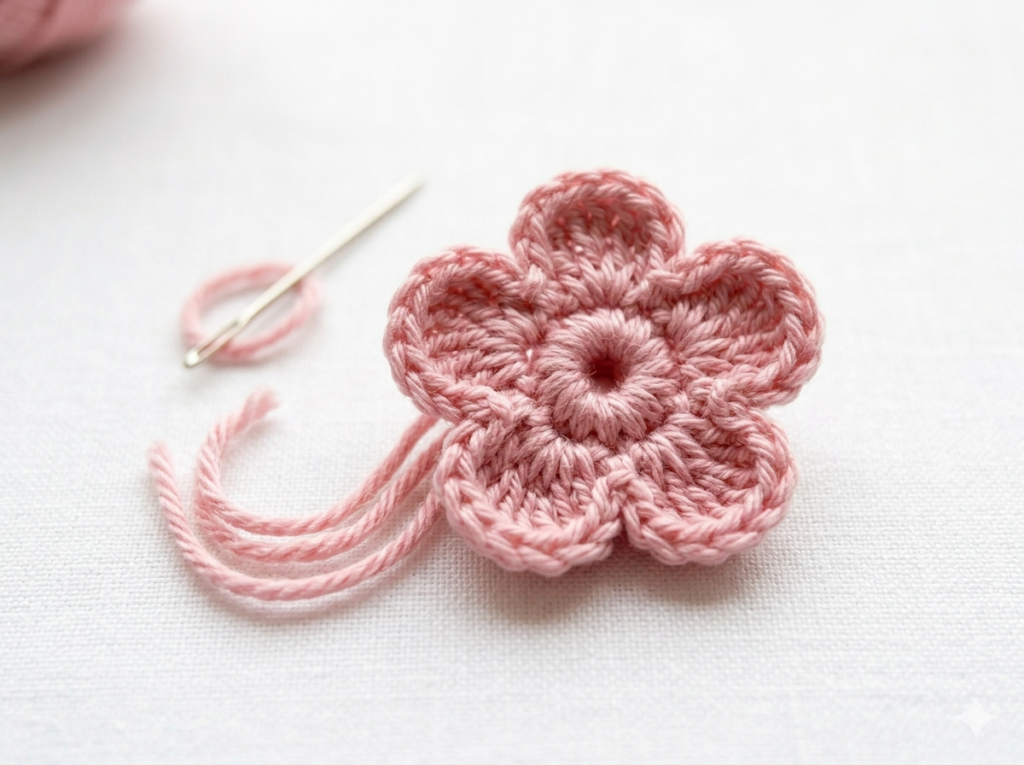
Instructions:
R1: MR, CH 1, work 10 SC into the ring, SL ST to first SC to join. Pull tail to close. [10]
R2 (petals): CH 3, SK 1 ST, SL ST into next ST. Repeat from * to * 4 more times. [5 petal loops created]
R3 (fill petals): Work (1 SC, 1 HDC, 3 DC, 1 HDC, 1 SC) into the next CH-3 space. Repeat from * to * 4 more times. [5 petals complete]
SL ST into the base of the first petal to finish. Fasten off, leaving a 15cm tail for sewing.
Finishing: Weave in the center tail only. Leave the long tail for attaching the flower to your project.
Designer tip: For a two-color flower, work R1 and R2 in your center color, then join your petal color at the beginning of R3. This creates a contrasting center that adds depth and realism.
Pattern 2: The Mini Daisy (Beginner)
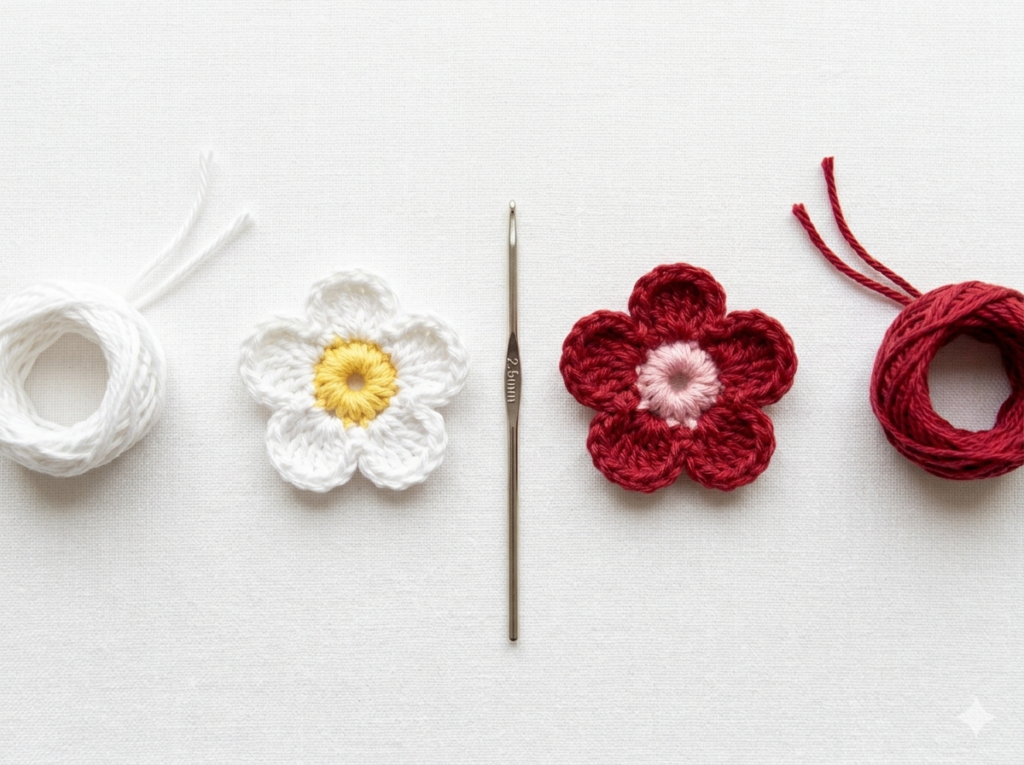
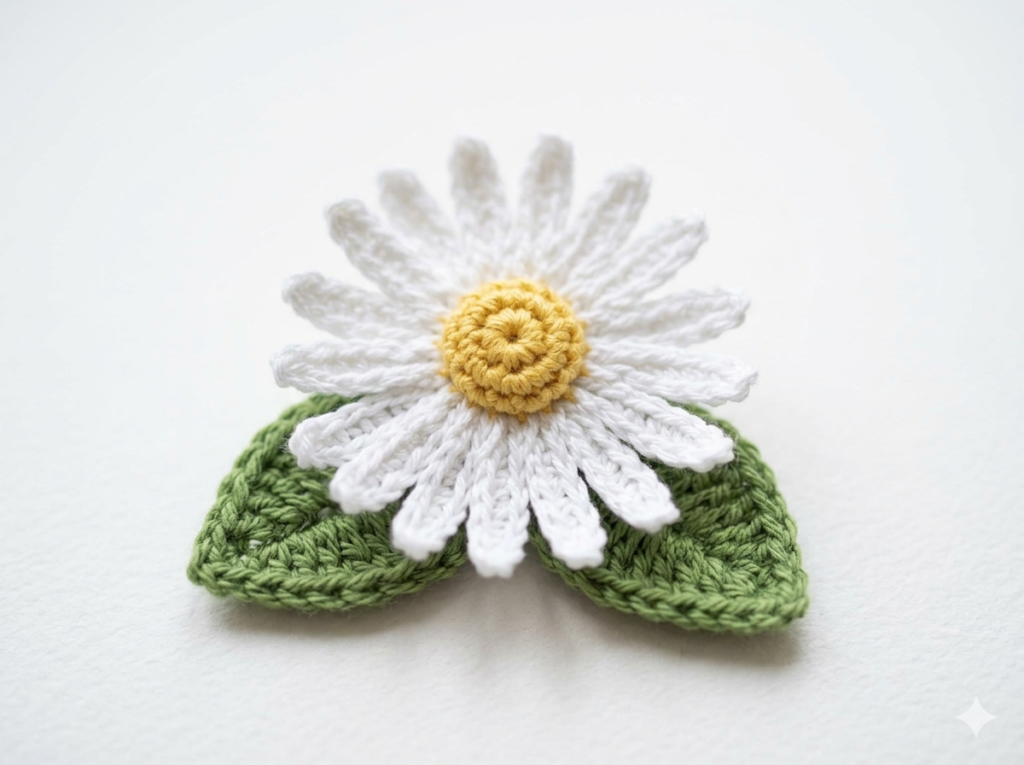
The mini daisy is one of the most recognizable tiny crochet flower patterns in the world. Its narrow, elongated petals and contrasting button center are universally charming and incredibly fast to make. A set of mini daisies in different sizes makes a stunning embellishment for the lily of valley bouquet blanket pattern.
Finished size: Approximately 4–5cm wide using DK yarn and a 3.0mm hook Skill level: Beginner Time: 20–25 minutes
Instructions:
R1 (center): In yellow yarn — MR, CH 1, 6 SC into ring, SL ST to join. [6]
R2 (center increase): CH 1, INC in each SC around, SL ST to join. [12]
Fasten off yellow. Join white yarn.
R3 (petal base): CH 1, SC in same stitch, CH 5, SK 1 ST, SC in next ST. Repeat from * to * 5 more times, ending with CH 5, SL ST to first SC. [6 petal loops]
R4 (fill petals): Work (1 SC, 2 HDC, 1 DC, 2 HDC, 1 SC) into next CH-5 space. Repeat 5 more times. [6 petals]
SL ST to first SC to finish. Fasten off, leaving a 15cm tail for sewing.
Designer tip: For a more realistic daisy, work R3 with CH 6 instead of CH 5 for slightly longer petals. For an extra-tiny daisy perfect for miniature projects, use fingering weight yarn and a 1.75mm hook — the finished flower will be approximately 2cm wide.
Pattern 3: The Puff Flower (Beginner-Intermediate)
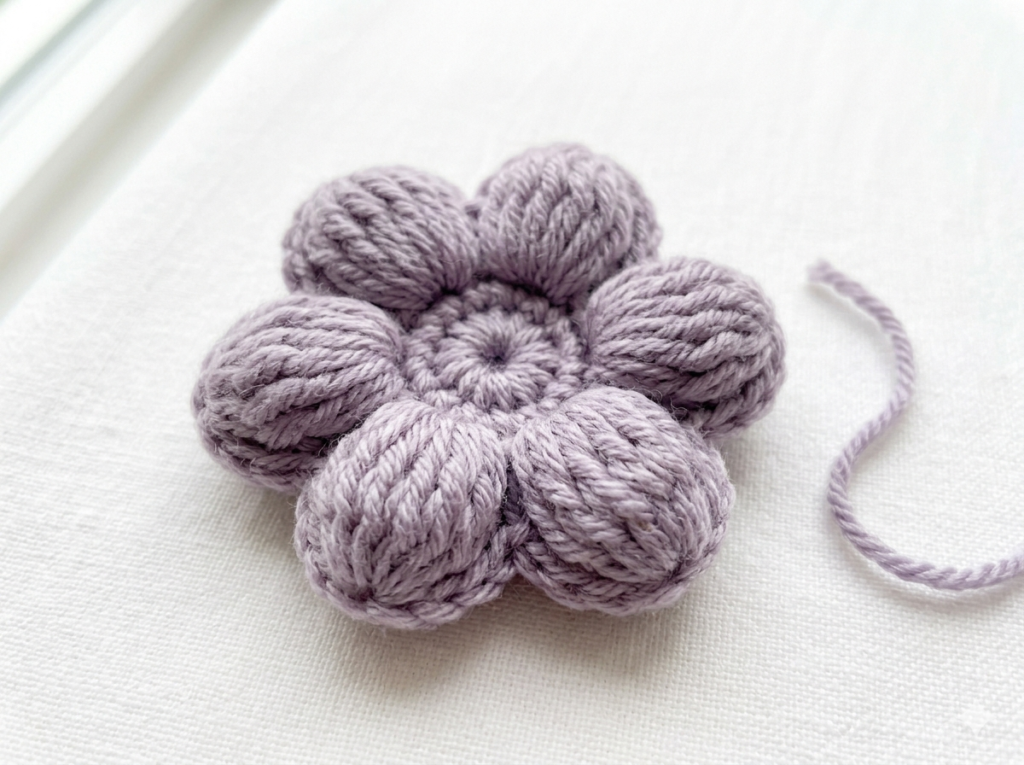
The puff flower is the tiny crochet flower that surprises people most. Its plump, rounded petals appear complex but are surprisingly achievable once you understand the technique. The secret is the puff stitch — a cluster of incomplete double crochets worked together to create a soft, three-dimensional petal.
Finished size: Approximately 5–6cm wide using DK yarn and a 3.0mm hook Skill level: Beginner-intermediate Time: 25–35 minutes
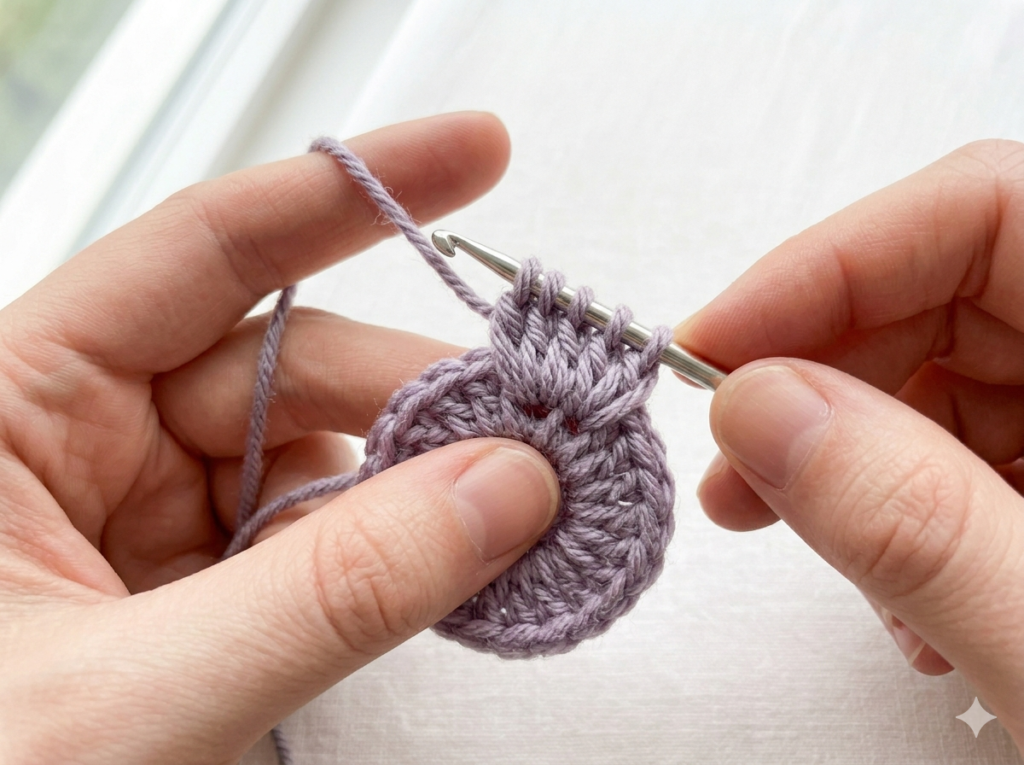
How to make a puff stitch (PS):
- Yarn over, insert hook into stitch
- Yarn over, pull up a loop (3 loops on hook)
- Yarn over, insert hook into the SAME stitch
- Yarn over, pull up a loop (5 loops on hook)
- Yarn over, insert hook into the SAME stitch again
- Yarn over, pull up a loop (7 loops on hook)
- Yarn over, pull through ALL 7 loops at once
- Chain 1 to lock the puff — this counts as the top of the stitch
Instructions:
R1: MR, CH 2, work 1 PS into ring, CH 1. (PS, CH 1) 5 more times into ring. SL ST to top of first PS to join. Pull tail to close. [6 puffs]
R2: SL ST into CH-1 space, CH 2. (PS, CH 2, PS) into same CH-1 space. CH 1. SC into next CH-1 space. CH 1. Repeat from * to * 5 more times. SL ST to top of first PS. [6 double-puff petals]
Fasten off, leaving a 15cm tail.
Designer tip: The puff stitch is easier to control with a slightly larger hook than you might normally use for the yarn weight. If your puffs feel too tight and difficult to pull through, go up 0.5mm in hook size. The petals should feel soft and rounded — not stiff.
Pattern 4: The Mini Rose (Intermediate)
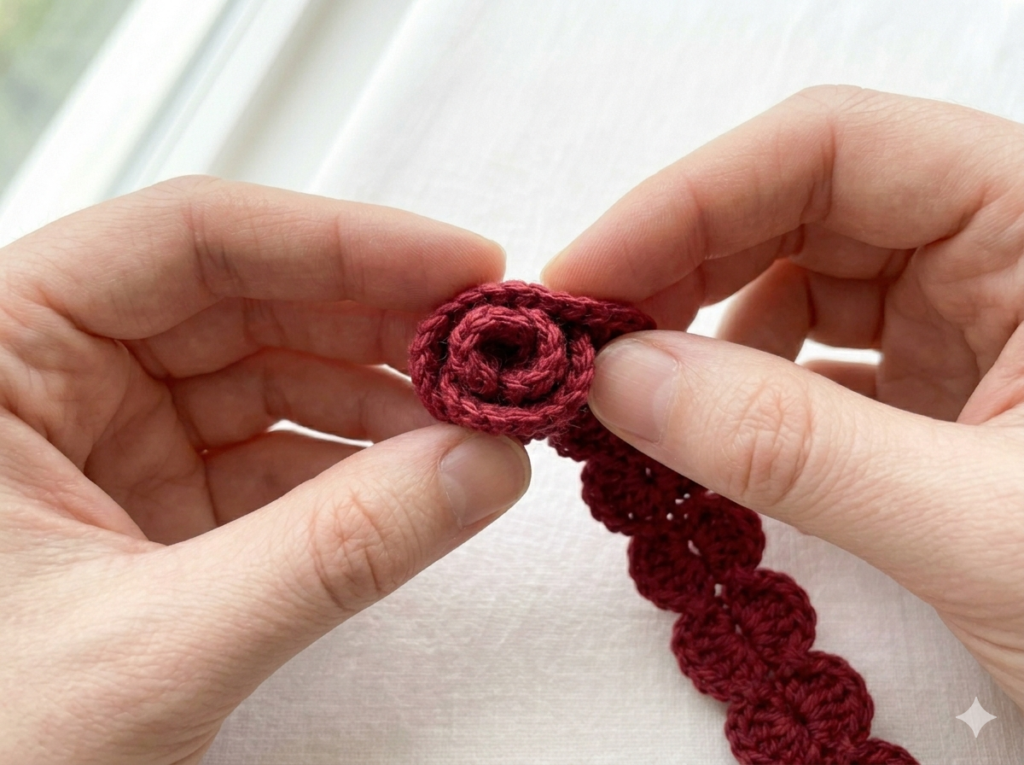
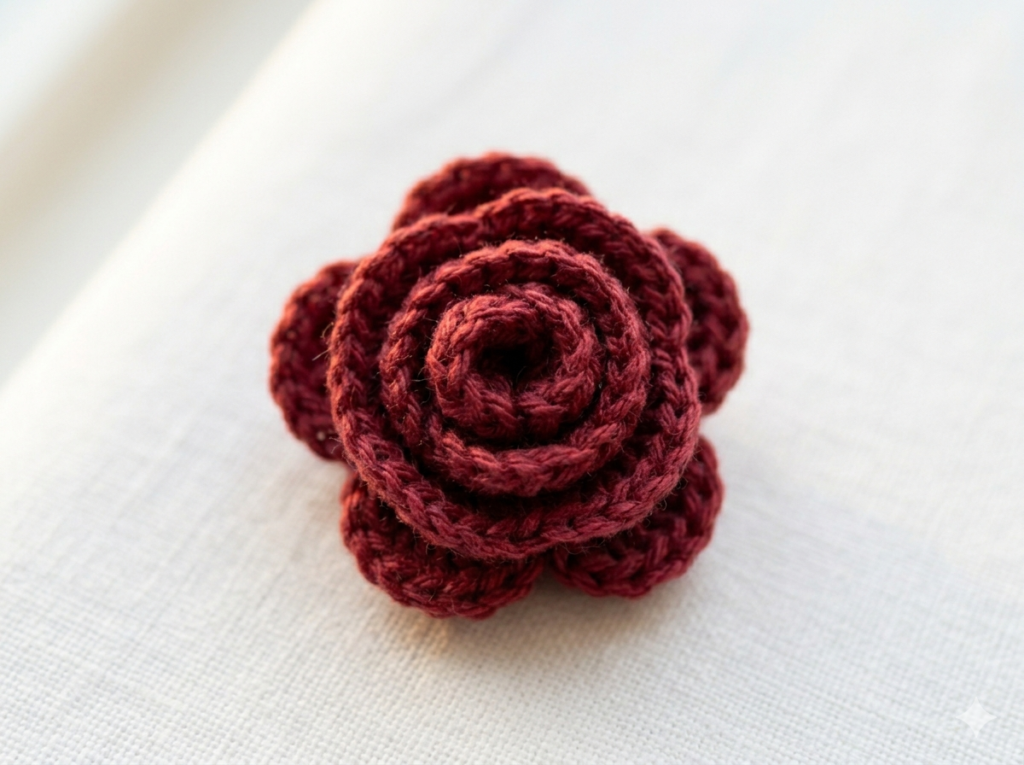
The mini rose is the tiny crochet flower that generates the most attention — and the most questions. Its spiral construction is unlike any other flower pattern, and the moment it coils into a rose shape is one of the most satisfying moments in crochet. This is the technique used in the full-size roses of the Rose Bouquet Blanket pattern, scaled down to create a miniature version perfect for embellishments.
Finished size: Approximately 3–4cm wide using DK yarn and a 2.5mm hook Skill level: Intermediate Time: 30–40 minutes
Instructions:
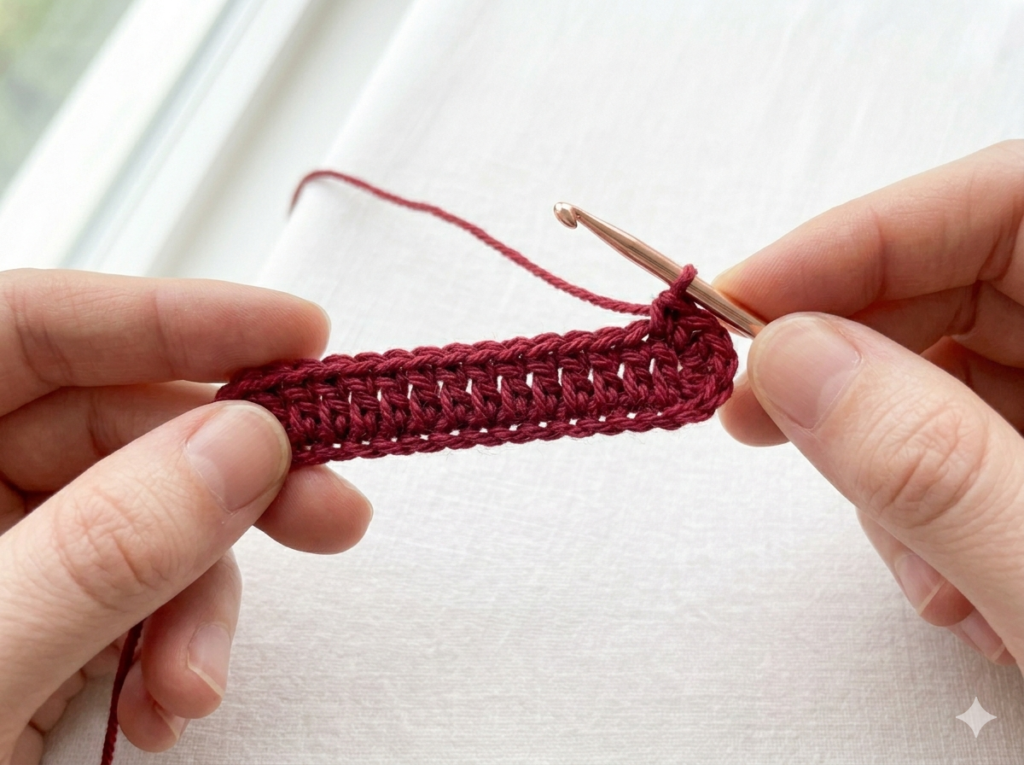
Foundation: CH 26.
Row 1: Starting in the 4th CH from hook, work 3 DC in the same CH. SK 1 CH, (SL ST, CH 3, 3 DC) in next CH. Repeat from * to * until 2 CH remain. SK 1 CH, SL ST in last CH. [6 petal shells created along the chain]
Do not fasten off.
Shaping the rose: Begin rolling the strip into a rose shape from the first petal shell. The base of each shell becomes the base of each rose petal layer. Hold the first petal tightly and begin wrapping the remaining strip around it in a spiral, with each successive petal shell slightly higher than the previous one.
Once the full strip is wound, thread the yarn tail onto your tapestry needle. Push the needle through the base of the rose from back to front multiple times, catching all layers. Pull the yarn tight to lock the rose shape permanently. Fasten off and trim the tail on the back.
Pattern 5: The Carnation Flower (Intermediate)
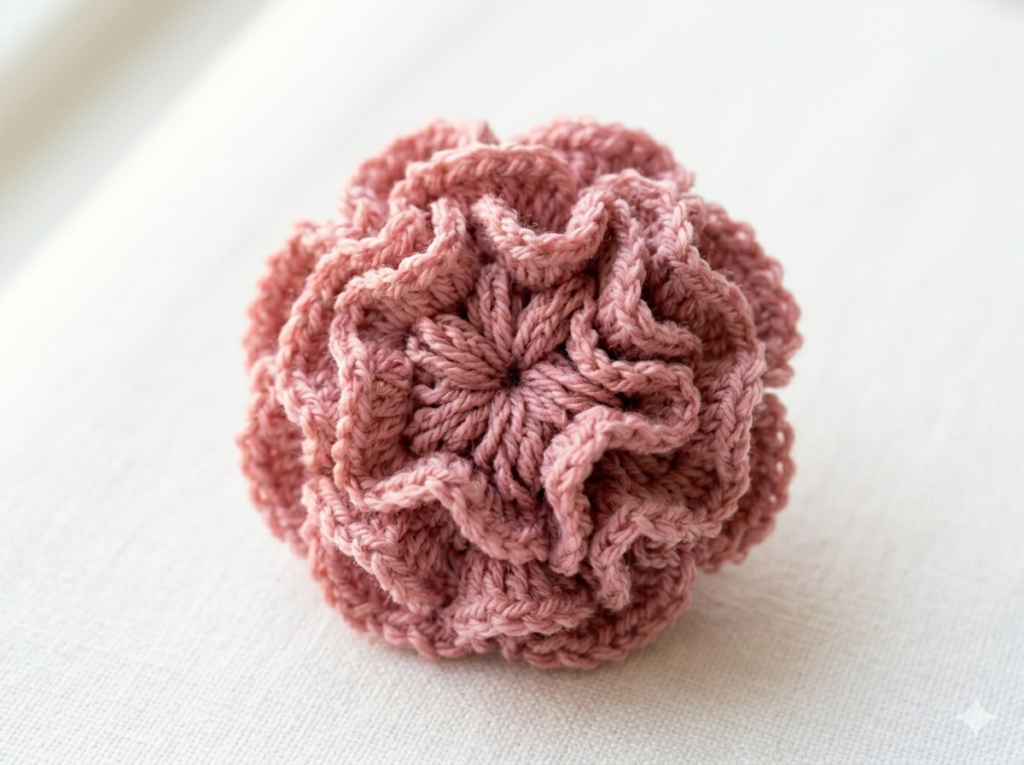
The carnation is the most dramatic tiny crochet flower in this collection. Its ruffled, layered petals create a lush, full appearance that looks far more complex than the technique actually requires. This miniature version uses the same construction method as the full carnation flowers in the Carnation Bouquet Blanket pattern — giving you a perfect preview of that project in miniature.
Finished size: Approximately 5–6cm wide using DK yarn and a 2.5mm hook Skill level: Intermediate Time: 35–45 minutes
Instructions:
R1 (calyx): MR, CH 1, 10 SC into ring, SL ST to join. Pull tail to close. [10]
R2: CH 1, 2 SC in each ST around, SL ST to join. [20]
R3: CH 1, 2 SC in each ST around, SL ST to join. [40]
R4 (first petal layer): CH 4, SL ST in same ST, SL ST in next ST. Repeat from * to * around. [20 small loops]
R5: Work (1 SC, 1 HDC, 2 DC, 1 HDC, 1 SC) into each CH-4 loop around. SL ST to join. [20 small ruffled petals]
R6 (second petal layer — work into R2 stitches, pulling work forward): Join yarn in any R2 stitch. CH 5, SL ST in same ST, SL ST in next R2 ST. Repeat around. [10 larger loops]
R7: Work (1 SC, 2 HDC, 3 DC, 2 HDC, 1 SC) into each CH-5 loop. SL ST to join. [10 larger petals]
Fasten off, leaving a long tail for sewing.
Designer tip: For a gradient carnation, work R1–R3 in a deep shade of your chosen color and switch to a lighter shade for R4–R7. This mimics the natural color variation seen in real carnation petals and adds significant visual depth.
How to Use Your Tiny Crochet Flowers
Now that you have five different tiny crochet flower patterns, here are the most effective ways to use them in your projects.
Sewing Flowers Onto a Blanket
The bouquet blanket collection on this website — featuring rose, carnation, and lily of valley designs — uses three-dimensional flowers sewn directly onto the blanket body. The exact same technique applies when adding tiny crochet flowers to any project.
Method:
- Position the flower on your project and pin it in place
- Thread the long yarn tail onto your tapestry needle
- Bring the needle up through the blanket from the back, through the center of the flower
- Bring it back down through the edge of the flower and through the blanket
- Repeat 4–6 times, spreading the attachment points around the flower for security
- Tie off on the back and weave in the end
For flowers that will receive heavy use — on bags, hats, or children’s items — add a second pass of stitching through the outer edge of the flower for extra security.
Making a Crochet Flower Bouquet
A collection of tiny crochet flowers in different sizes and colors makes a beautiful handmade bouquet that lasts forever. Here is how to assemble one:
- Make 10–15 tiny flowers in your chosen colors and sizes
- Cut floral wire or bamboo skewers to your desired stem length
- Wrap each wire with green yarn or floral tape
- Attach each flower to a stem by threading the yarn tail around the top of the wire multiple times and securing with a knot
- Arrange the flowers in a bundle, varying heights for a natural look
- Wrap the stems together with a length of ribbon or additional green yarn
Blocking is the process of wetting and shaping your finished crochet pieces to help them lie flat and achieve their ideal dimensions. For tiny crochet flowers made from cotton yarn, blocking makes a significant difference to the final appearance.
How to block a tiny crochet flower:
- Soak the finished flower in cool water for 5–10 minutes
- Gently squeeze out excess water — do not wring
- Place the flower on a foam blocking mat or towel
- Use blocking pins to pin each petal out to its full extension, keeping the flower symmetrical
- Allow to dry completely before unpinning — typically 2–4 hours depending on yarn weight
Acrylic yarn flowers do not respond as dramatically to wet blocking but can be steam-blocked using a steam iron held several centimeters above the flower surface.
Troubleshooting Your Tiny Crochet Flowers
Even experienced makers encounter occasional problems with crochet flowers. Here are the most common issues and how to solve them.
The center hole will not close: This means the magic ring was not pulled tight enough, or the yarn tail was not secured before working. Solution: thread the tail onto your tapestry needle, weave it through the center stitches of Round 1, and pull firmly to gather them closed. Secure with a small knot on the back.
The petals curl upward or downward: Petals that curl significantly usually indicate tension that is too tight (curling inward) or too loose (flopping outward). For tighter tension, try going up 0.5mm in hook size. For looser tension, go down 0.5mm. The correct tension for a flat flower produces petals that sit naturally flat without pinning.
The puff stitches are too difficult to pull through: If you find the final pull-through on the puff stitch too stiff, you are pulling up loops that are too tight. Work each incomplete double crochet with a slightly looser tension — pull the loop up to the height of a standard double crochet post before moving to the next one. This gives you enough slack to pull through all loops comfortably.
The mini rose will not hold its shape: The rose needs its layers secured through the base with the yarn tail before it will hold its spiral shape permanently. If the rose springs open after rolling, the tail stitching was not tight enough or did not catch all layers. Re-thread the tail and work through the base several more times, pulling firmly each time.
The flower measures too large or too small: All measurements in this guide are based on DK weight yarn and a 3.0mm hook. If your flower is larger than stated, you are either using a heavier yarn, a larger hook, or your tension is looser than standard. If smaller, the reverse applies. All of these adjustments are perfectly valid — the size simply changes. Follow the stitch count and the result will be correct for your chosen materials.
Color Inspiration for Your Tiny Crochet Flowers
Choosing colors is one of the most enjoyable parts of making any tiny crochet flower collection. Here are some color combinations that work beautifully together:
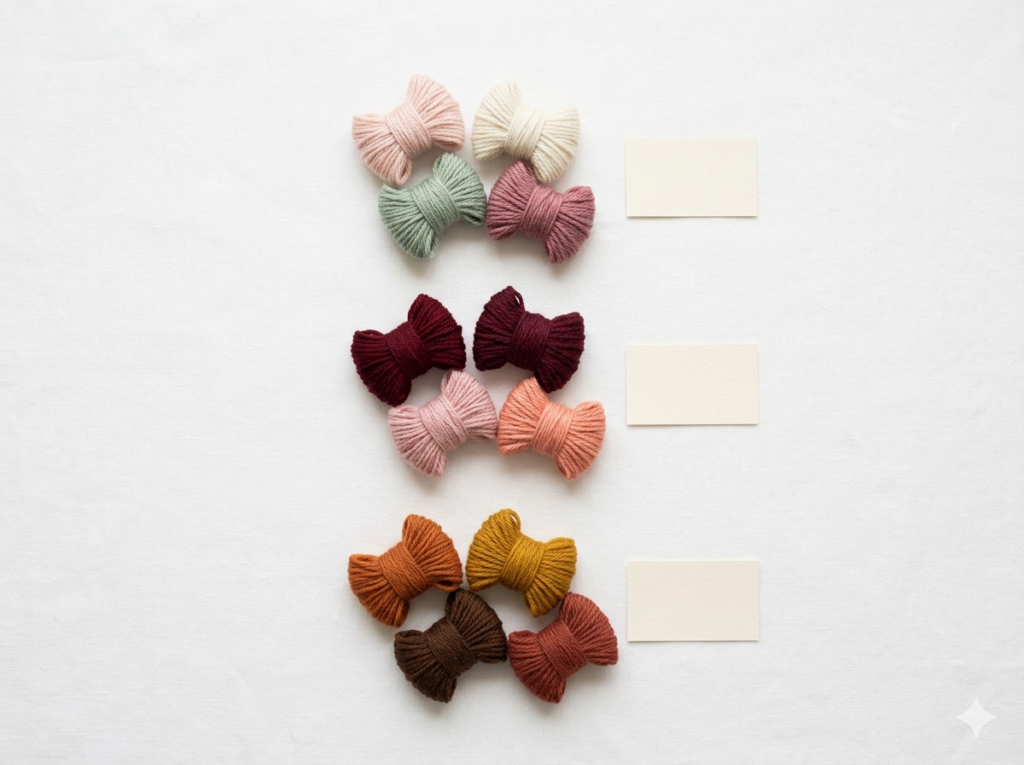
Spring Garden: Soft blush pink, cream white, sage green, dusty rose — perfect for baby gifts, spring bouquets, and the rose bouquet blanket
Blush Romance: Deep wine red, soft pink, dusty rose, warm white — ideal for Valentine’s Day gifts, romantic bouquets, wedding decorations
Autumn Harvest: Burnt orange, mustard yellow, deep brown, rust red — striking for autumn wreaths, harvest-themed decor, warm-toned blanket embellishments
Cool Garden: Powder blue, soft lavender, lilac, white — beautiful for summer projects, bedroom decor, calming color palettes
Meadow: Sunshine yellow, grass green, sky blue, pure white — cheerful and versatile, works for children’s projects and spring decor
Frequently Asked Questions About Tiny Crochet Flowers
How small can a tiny crochet flower be? Using fingering weight yarn and a 1.75mm hook, the classic 5-petal flower pattern in this guide produces a flower approximately 2cm wide — small enough to use on jewelry, embroidered art, and miniature doll accessories. For anything smaller, thread-weight crochet with a 0.75–1.0mm steel hook is used, though this requires significant experience and magnification for most makers.
Can I sell items made from these free tiny crochet flower patterns? Yes. All five patterns in this guide are free for personal and commercial use. You may sell finished flowers, bouquets, blankets, and other items made from these patterns. You may not sell or redistribute the written patterns themselves.
What is the best yarn for tiny crochet flowers? Smooth, tightly spun cotton DK yarn gives the sharpest stitch definition and the most professional-looking flowers. It also holds its shape better than acrylic when used for flowers that are not stuffed. For flowers intended for children’s items or anything that needs to be soft and washable, high-quality acrylic DK is the practical choice.
How do I keep my flowers symmetrical? Symmetry in crochet flowers comes almost entirely from accurate stitch counts. The most important habit you can develop is counting your stitches at the end of every round before moving on. A single miscounted stitch in Round 1 or Round 2 creates an asymmetric flower that cannot be corrected later without unraveling.
Can I use these tiny crochet flower patterns on a bouquet blanket? Absolutely — and the results are stunning. The 5-petal flower, puff flower, and carnation patterns in this guide all attach beautifully to the flower bouquet blanket designs in our pattern collection. The mini rose is particularly striking when used to add extra detail between the larger full-size roses on the Rose Bouquet Blanket.
How many flowers do I need for a full bouquet blanket? The full-size bouquet blanket patterns in our collection use between 50 and 102 flowers depending on the design. If you are practicing technique before starting a full blanket, making 10 flowers of each type gives you a good sample of all the techniques involved and a beautiful finished set for other projects.
What to Make Next
If you have worked through all five tiny crochet flower patterns in this guide, you are ready for the next step: creating a full bouquet blanket where dozens of three-dimensional flowers transform a circular crochet base into a breathtaking floral arrangement.
Our signature bouquet blanket collection includes three full patterns:
- Rose Bouquet Blanket: 69 full-size roses sewn onto a beige circular blanket base — the most dramatic of the three designs
- Carnation Bouquet Blanket: 50 carnation flowers using the same construction method as Pattern 5 in this guide, scaled up
- Lily of Valley Bouquet Blanket: 102 delicate lily of valley flowers — the most intricate and elegant design in the collection
Each pattern includes full stitch counts, round-by-round instructions, and links to step-by-step video tutorials.
Summary: 5 Tiny Crochet Flower Patterns at a Glance
| Pattern | Skill level | Hook | Time | Finished size |
|---|---|---|---|---|
| Classic 5-petal flower | Beginner | 3.0mm | 15–20 min | ~4cm |
| Mini daisy | Beginner | 3.0mm | 20–25 min | ~4–5cm |
| Puff flower | Beginner-intermediate | 3.0mm | 25–35 min | ~5–6cm |
| Mini rose | Intermediate | 2.5mm | 30–40 min | ~3–4cm |
| Carnation | Intermediate | 2.5mm | 35–45 min | ~5–6cm |
Made one of these tiny flowers? Leave a comment below and tell us which pattern was your favorite — and what you used it for.