Free Wolf Crochet Pattern: The Ultimate Beginner-Friendly Amigurumi Guide
A wolf crochet pattern is one of the most searched amigurumi projects online — and for good reason. Wolves are dramatic, expressive, and endlessly customizable. Whether you make yours in classic grey and white, a moody charcoal black, or even a fantastical purple or teal, a crocheted wolf has an undeniable character that no other […]
A wolf crochet pattern is one of the most searched amigurumi projects online — and for good reason. Wolves are dramatic, expressive, and endlessly customizable. Whether you make yours in classic grey and white, a moody charcoal black, or even a fantastical purple or teal, a crocheted wolf has an undeniable character that no other stuffed animal quite matches.
This free wolf crochet pattern is written specifically for makers who want clear, tested instructions they can follow from start to finish without confusion. Every round is written out in full. Every stitch count is verified. Every technique that might trip up a newer crocheter is explained before you need it.
If you have made a few amigurumi projects before and are comfortable with basic stitches, this wolf crochet pattern is exactly the right next step. If you are brand new to amigurumi, read through the techniques section before you begin and you will find this pattern entirely achievable.
By the end of this guide, you will have a finished amigurumi wolf approximately 20–25cm tall, a strong understanding of the construction techniques used, and a clear path toward more complex amigurumi patterns in our collection.
What You Need for This Wolf Crochet Pattern
Before you begin any wolf crochet pattern, gathering all your materials saves time and prevents interruptions mid-project. Here is the complete materials list.
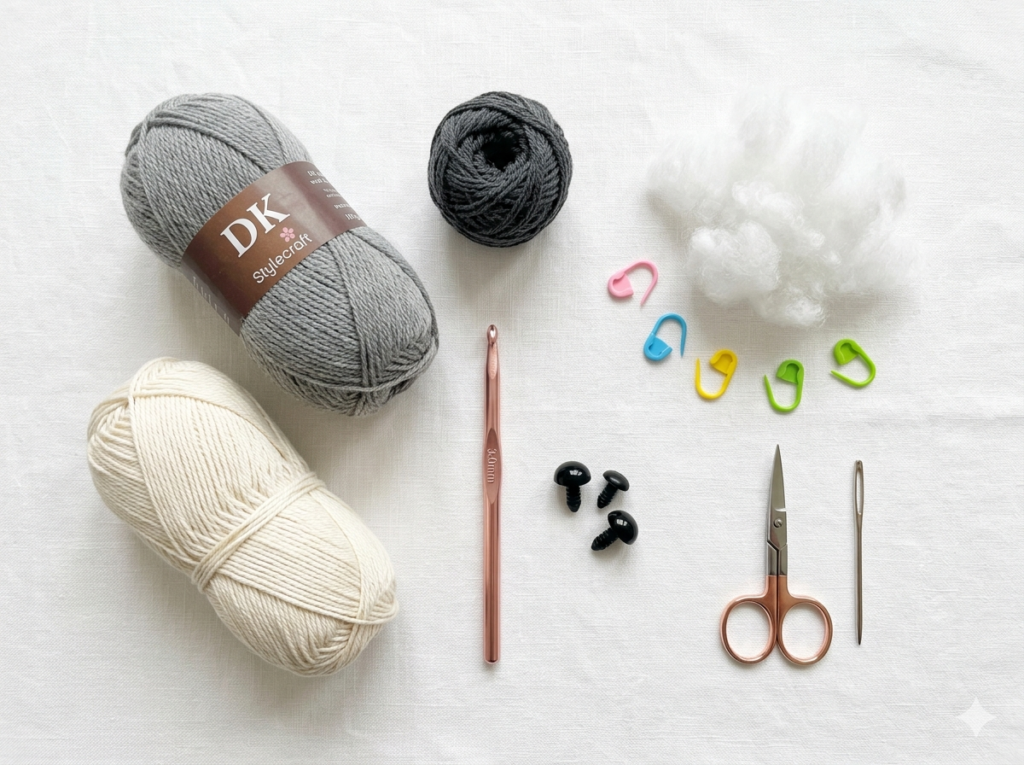
Yarn
- Main color (MC): Medium grey or charcoal — approximately 80–100g of DK or sport weight yarn
- Secondary color (SC): Light grey or off-white — approximately 30–40g
- Accent color (AC): Dark grey or black — approximately 10–15g for muzzle details
Yarn recommendations: Any smooth DK or sport weight yarn works well for this wolf crochet pattern. Avoid fluffy or textured yarns for your first attempt — they make it difficult to see your stitches clearly and count accurately. Cotton or acrylic blend yarns give the cleanest stitch definition.
If you want a softer, more cuddly result, a high-quality acrylic such as Paintbox Simply DK or Lion Brand Pound of Love gives excellent results for amigurumi projects.
Hook and Tools
- Crochet hook: 2.5mm or 3.0mm (a tighter gauge gives amigurumi its characteristic firm, neat appearance)
- Yarn needle / tapestry needle: For weaving in ends and sewing pieces together
- Stitch markers: At least 3–4 to mark the beginning of rounds
- Scissors
- Pins: For positioning pieces before sewing
Filling and Eyes
- Polyester fiberfill: Enough to stuff the body, head, and limbs firmly — approximately 50–80g
- Safety eyes: 12mm black safety eyes (2 pieces). If making this wolf crochet pattern for a child under 3, embroider eyes in black yarn instead for safety.
Finished Size
Using a 3.0mm hook and DK weight yarn: approximately 20–25cm tall when seated. Using a 2.5mm hook: slightly smaller and firmer — approximately 18–22cm tall.
Stitch Abbreviations for This Wolf Crochet Pattern
Every wolf crochet pattern uses a standard set of abbreviations. Here is the complete reference list for this pattern:
| Abbreviation | Stitch name | Description |
|---|---|---|
| MR | Magic ring | Adjustable loop to begin crocheting in the round |
| SC | Single crochet | Basic crochet stitch |
| INC | Increase | Work 2 SC into the same stitch |
| DEC | Decrease (invisible) | Work 2 stitches together invisibly |
| SC2TOG | Single crochet 2 together | Standard decrease method |
| CH | Chain stitch | Foundation chain or turning chain |
| SL ST | Slip stitch | Joining stitch |
| BLO | Back loop only | Work through back loop of stitch only |
| FLO | Front loop only | Work through front loop of stitch only |
| R | Round | One complete round of stitches |
| ST / STS | Stitch / stitches | Individual stitch count |
| ( ) | Repeat | Work instructions inside brackets the indicated number of times |
| [ ] | Total stitch count | Number in brackets at end of round = total stitches in that round |
Working method: This wolf crochet pattern is worked in a continuous spiral. Do not join rounds with a slip stitch unless specifically instructed. Use a stitch marker to mark the first stitch of each round and move it up as you go.
Techniques You Need for This Wolf Crochet Pattern
Before beginning this wolf crochet pattern, review these core amigurumi techniques. If you are already confident with all of them, skip ahead to the pattern instructions.
The Magic Ring (MR)
The magic ring — also called the magic circle — is how nearly every amigurumi piece begins, including every piece in this wolf crochet pattern. It creates a tight, gapless center that a foundation chain cannot replicate.
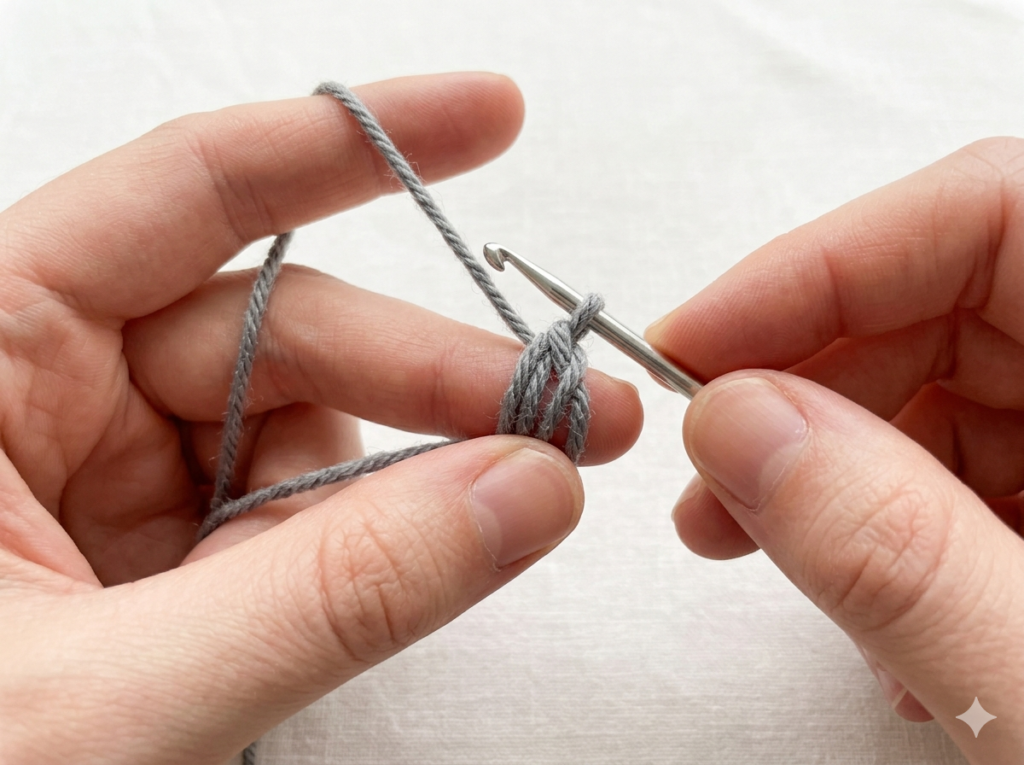
How to make a magic ring:
- Wrap yarn around your finger twice to create a loop.
- Insert your hook through the loop, yarn over, and pull up a loop.
- Chain 1 to secure (this does not count as a stitch).
- Work your first round of single crochets directly into the ring.
- Pull the yarn tail to close the ring tightly before continuing.
The Invisible Decrease (DEC)
The invisible decrease gives amigurumi its characteristic smooth surface. It is used throughout this wolf crochet pattern to shape the head and body.
How to work the invisible decrease:
- Insert hook through the front loop only of the next stitch.
- Without completing the stitch, insert hook through the front loop only of the following stitch.
- You now have 3 loops on your hook.
- Yarn over and pull through all 3 loops in one motion.
- This counts as one stitch and is nearly invisible on the right side.
Stuffing as You Go
With amigurumi, it is always easier to stuff before the opening becomes too small to fit your hand through. In this wolf crochet pattern, stuffing is added at specific points marked in the instructions. Stuff firmly — a well-stuffed amigurumi holds its shape and looks professional. A loosely stuffed piece looks deflated and unfinished.
Sewing Pieces Together
The most important finishing skill for any wolf crochet pattern is sewing the individual pieces together neatly. Use the yarn tail left when you fasten off each piece. Thread it onto your tapestry needle and use a ladder stitch or whip stitch to attach limbs, ears, and the tail to the body. Use pins to position everything symmetrically before you sew — small asymmetries in ear or limb placement are the single most common finishing mistake in amigurumi.
Free Wolf Crochet Pattern — Complete Instructions
Work in continuous rounds unless otherwise stated. Use a stitch marker to track the beginning of each round.
Part 1: Head
The head is the most expressive part of this wolf crochet pattern. Work in MC (main grey) unless otherwise noted.
R1: MR, 6 SC [6] R2: INC × 6 [12] R3: (SC, INC) × 6 [18] R4: (2 SC, INC) × 6 [24] R5: (3 SC, INC) × 6 [30] R6: (4 SC, INC) × 6 [36] R7: (5 SC, INC) × 6 [42] R8: (6 SC, INC) × 6 [48] R9–R14: SC around [48] (6 rounds even) R15: (6 SC, DEC) × 6 [42] R16: SC around [42] R17: (5 SC, DEC) × 6 [36] R18: SC around [36]
→ Insert safety eyes between R12 and R13, approximately 10–12 stitches apart. If making for a child under 3, skip this step and embroider eyes after finishing.
R19: (4 SC, DEC) × 6 [30] R20: (3 SC, DEC) × 6 [24]
→ Begin stuffing head firmly. Continue adding stuffing as you close.
R21: (2 SC, DEC) × 6 [18] R22: (SC, DEC) × 6 [12] R23: DEC × 6 [6]
Fasten off, leaving a long tail. Close the remaining 6 stitches with your tapestry needle. Weave in end.
Part 2: Muzzle
The muzzle adds dimension and character to this wolf crochet pattern. Work in SC (secondary color — off-white or light grey).
R1: MR, 6 SC [6] R2: INC × 6 [12] R3: (SC, INC) × 6 [18] R4: (2 SC, INC) × 6 [24] R5–R6: SC around [24] (2 rounds even)
Fasten off, leaving a long tail for sewing. Lightly stuff the muzzle before attaching.
Nose: Using AC (dark grey or black yarn), embroider a triangular nose at the top center of the muzzle. Create an upside-down triangle shape approximately 3–4 stitches wide and 2–3 rows tall. Then embroider a short line downward from the center of the nose and two short curved lines outward at the bottom to form the mouth.
Position the muzzle centered on the lower half of the head, between R16 and R22. Pin in place and sew using the yarn tail in a neat whip stitch around the entire edge.
Part 3: Body
Work in MC (main grey).
R1: MR, 6 SC [6] R2: INC × 6 [12] R3: (SC, INC) × 6 [18] R4: (2 SC, INC) × 6 [24] R5: (3 SC, INC) × 6 [30] R6: (4 SC, INC) × 6 [36] R7: (5 SC, INC) × 6 [42] R8–R10: SC around [42] (3 rounds even) R11: (5 SC, DEC) × 6 [36] R12–R14: SC around [36] (3 rounds even) R15: (4 SC, DEC) × 6 [30] R16–R18: SC around [30] (3 rounds even) R19: (3 SC, DEC) × 6 [24] R20: SC around [24]
→ Begin stuffing body firmly.
R21: (2 SC, DEC) × 6 [18] R22: (SC, DEC) × 6 [12] R23: DEC × 6 [6]
Fasten off, leaving a long tail. Close remaining 6 stitches. Weave in end.
Part 4: Front Legs (Make 2)
Work in MC.
R1: MR, 6 SC [6] R2: INC × 6 [12] R3: BLO SC around [12] (creates a clean paw ridge) R4–R8: SC around [12] (5 rounds even)
→ Switch to SC (secondary color) for the upper leg.
R9–R14: SC around [12] (6 rounds even)
→ Stuff the paw and lower leg firmly. Leave upper leg lightly stuffed for flexibility.
R15: DEC × 3, SC × 6 [9]
Fasten off, leaving a long tail for sewing. Flatten the top opening before sewing to the body.
Part 5: Back Legs (Make 2)
Work in MC.
R1: MR, 8 SC [8] R2: INC × 8 [16] R3: BLO SC around [16] R4–R6: SC around [16] (3 rounds even) R7: (2 SC, DEC) × 4 [12] R8–R12: SC around [12] (5 rounds even)
→ Stuff firmly.
R13: DEC × 3, SC × 6 [9]
Fasten off, leaving a long tail. The back legs are slightly larger and rounder than the front legs, giving this wolf crochet pattern its characteristic seated pose.
Part 6: Ears (Make 2)
The ears are one of the most distinctive features of any wolf crochet pattern. Work a two-color ear for a more realistic result.
Outer ear — MC: R1: MR, 6 SC [6] R2: (SC, INC) × 3 [9] R3: (2 SC, INC) × 3 [12] R4: (3 SC, INC) × 3 [15] R5: SC around [15]
Fasten off. Do not stuff.
Inner ear — SC (off-white or light grey): R1: MR, 4 SC [4] R2: (SC, INC) × 2 [6] R3: (2 SC, INC) × 2 [8] R4: SC around [8]
Fasten off, leaving a long tail.
Assembling the ear: Place the inner ear on top of the outer ear, centering it. Sew around the edge of the inner ear to attach it to the outer ear. Then fold the outer ear in half lengthwise and sew the base together — this gives the ear its pointed, upright wolf shape. Attach both ears symmetrically to the top of the head between R3 and R7, approximately 12 stitches apart.
Part 7: Tail
The tail completes the silhouette of this wolf crochet pattern. A well-made bushy tail is what makes a wolf unmistakably a wolf.
Work in MC.
R1: MR, 6 SC [6] R2: INC × 6 [12] R3: SC around [12] R4: (SC, INC) × 6 [18] R5–R7: SC around [18] (3 rounds even) R8: (SC, DEC) × 6 [12] R9–R14: SC around [12] (6 rounds even)
→ Stuff tail lightly. A lightly stuffed tail curves naturally; a firmly stuffed tail stands straight. Choose based on the pose you prefer.
R15: (SC, DEC) × 4 [8] R16: SC around [8]
Fasten off, leaving a long tail for sewing. Attach the tail to the lower back of the body, angling it upward slightly.
Part 8: Chest Patch (Optional)
Many wolf crochet patterns include a lighter chest patch for a more realistic wolf appearance. This is worked flat, not in the round.
Work in SC (off-white or light grey).
Row 1: CH 5, SC in 2nd CH from hook, SC to end [4] Row 2: CH 1, turn. SC across [4] Row 3: CH 1, turn. INC, 2 SC, INC [6] Row 4: CH 1, turn. SC across [6] Row 5: CH 1, turn. INC, 4 SC, INC [8] Row 6: CH 1, turn. SC across [8] Row 7: CH 1, turn. DEC, 4 SC, DEC [6] Row 8: CH 1, turn. DEC, 2 SC, DEC [4]
Fasten off, leaving a long tail. Sew the chest patch to the front of the body between R8 and R16, centered.
Assembly: Putting Your Wolf Together
This is the stage where your wolf crochet pattern transforms from individual pieces into a finished character. Take your time with assembly — it makes the difference between an amigurumi that looks professionally made and one that looks handmade in a less polished way.
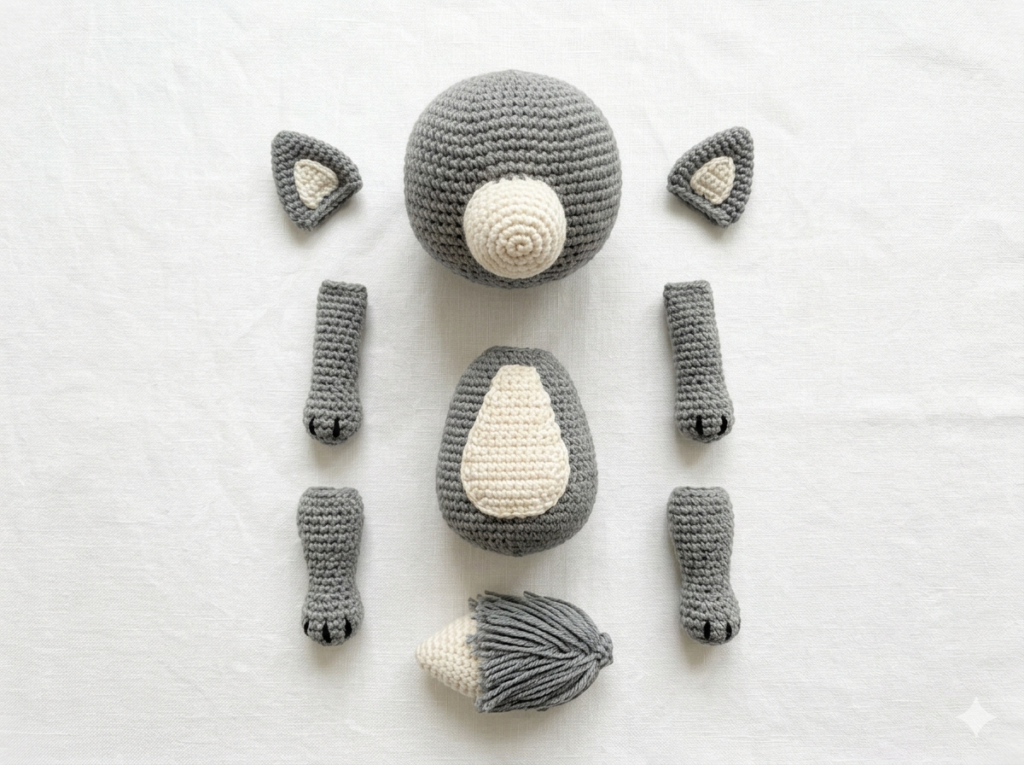
Step 1 — Position before sewing: Lay out all finished pieces in front of you. Place the head on top of the body without sewing. Position the front legs on either side of the lower body. Position the back legs slightly behind and to the sides. Hold the ears against the head and check for symmetry. Use pins to mark all attachment points before you pick up a needle.
Step 2 — Attach the head: The head is the heaviest piece and the most important attachment in this wolf crochet pattern. Align the bottom opening of the head with the top of the body. Using the yarn tail from the head, sew all the way around the opening in a tight whip stitch. After one full round, go around a second time in the opposite direction for strength. The head of an amigurumi this size needs a very secure attachment.
Step 3 — Attach the front legs: Position the front legs on either side of the body at approximately R14–R16 of the body. The flattened top of each leg should sit flush against the body. Sew using the yarn tail in a flat seam, going through both the leg edge and the body stitches. After sewing, gently tug the leg to test the attachment — it should feel completely secure.
Step 4 — Attach the back legs: Back legs sit slightly lower and further back than the front legs, at approximately R18–R20 of the body. Attach in the same manner as the front legs. For a seated pose, angle the back legs slightly outward and forward so the wolf sits stably on a flat surface.
Step 5 — Attach the tail: Position the tail at the center back of the body at approximately R20, angling upward at 30–45 degrees. Sew using the yarn tail in a tight circular seam around the entire base of the tail.
Step 6 — Attach the muzzle and ears: The muzzle should already be attached to the head if you followed the head instructions. Double-check that it is secure. Attach both ears symmetrically to the top of the head — measure from the center of the head to each ear to confirm equal spacing before sewing.
Step 7 — Final details: Trim any loose yarn ends. Check all seams from every angle and reinforce any that feel loose. If any stitches on the body are slightly gappy from stuffing, use your tapestry needle to ease them together.
Customization Ideas for Your Wolf Crochet Pattern
One of the greatest strengths of this wolf crochet pattern is how easily it adapts to different colors and styles. Here are the most popular customizations:
Color variations:
- Arctic wolf: Work entirely in white with light grey shading on the ears and tail tip
- Black wolf: Full charcoal or true black with silver-grey inner ears and chest
- Brown wolf: Warm chestnut brown with cream muzzle and chest patch — resembles a timber wolf
- Fantasy wolf: Deep teal, midnight purple, or dusty lavender — popular for gifts and collector pieces
Size variations:
- Use chunky weight yarn and a 5.0mm hook for a wolf approximately twice the standard size
- Use fingering weight yarn and a 1.75mm hook for a miniature wolf keychain or bag charm
Expression variations:
- Embroider a smile by stitching a small curved line below the nose
- Add eyebrows by embroidering two short diagonal lines above the safety eyes in dark yarn
- Create a “fierce” expression by placing the safety eyes slightly closer together and angling the eyebrows downward
Accessories:
- A simple crocheted scarf in a contrasting color takes approximately 15 minutes and dramatically enhances the finished piece
- A small bow tie or flower collar makes the wolf an ideal gift for adults
- A tiny crocheted moon or star sewn to the chest works perfectly for celestial-themed wolves
Troubleshooting Common Issues with Amigurumi Wolf Patterns
Even experienced crocheters encounter occasional issues with amigurumi. Here are the most common problems and their solutions.
The head wobbles or does not sit straight: This almost always means the head-to-body attachment is not secure enough or was sewn off-center. Remove the stitches, reposition the head using pins, and resew with a tighter seam going around twice.
The muzzle puckers when sewn on: The muzzle is slightly too large for the attachment area. Try pinning the muzzle at four points (top, bottom, left, right) and distributing the ease evenly as you sew, rather than working straight around.
The stuffing shows through the stitches: This typically means either the hook size is too large for the yarn weight, or the tension is looser than ideal. For future projects, drop down one hook size. For the current project, use white or neutral-colored stuffing so it is less visible through the stitches.
The amigurumi does not sit upright: Check that the back legs are positioned correctly — they need to be angled outward and slightly forward to create a stable tripod base with the tail. If the wolf still tips, add a small flat disc of crochet to the base of the body (3 rounds of SC in the round, starting with MR and increasing to the body diameter) and sew it on.
Stitch counts do not match the pattern: The most common cause is a miscounted increase round early in the piece. If your count is off by a multiple of 6, you likely missed one increase in round 2 or 3. Unpick back to the error and redo the affected rounds — it is faster than trying to compensate later.
Frequently Asked Questions About Wolf Crochet Patterns
How long does this wolf crochet pattern take to complete? For a maker who is comfortable with basic amigurumi techniques, the full wolf takes approximately 8–12 hours including assembly. Working in sessions of 1–2 hours over a week is the most common approach.
What skill level is this wolf crochet pattern? This pattern is rated beginner-intermediate. You need to be comfortable with single crochet, magic rings, and working in the round. The invisible decrease is the most technically demanding stitch — review the technique section before you begin.
Can I sell finished wolves made from this wolf crochet pattern? Yes. This is a free wolf crochet pattern for personal and commercial use. You may sell finished amigurumi wolves made from this pattern in your own shop. You may not resell or redistribute the pattern itself as your own.
What is the best yarn for amigurumi wolf patterns? Smooth, tightly spun DK or sport weight yarn gives the cleanest stitch definition and the most professional result. High-quality acrylic is the most popular choice among amigurumi makers for its durability, washability, and wide color range. Cotton yarn gives a slightly stiffer result that some makers prefer for the body and limbs.
Can I make this wolf larger or smaller? Yes. To make a larger wolf, use a heavier yarn weight and a larger hook. To make a smaller wolf, use fingering weight yarn and a 1.5–1.75mm hook. All stitch counts remain the same — only the finished size changes.
Are safety eyes safe for babies? Safety eyes should not be used on items intended for children under 3 years old. For baby-safe wolves, embroider the eyes in black yarn using a satin stitch or French knot instead. This gives a softer, equally charming result with no small parts that could be removed.
Care Instructions for Your Finished Wolf
A finished amigurumi wolf made from acrylic yarn can be:
- Hand washed in cool water with mild soap, then reshaped and air-dried flat
- Machine washed on a delicate cycle in a laundry bag — the stuffing may shift slightly and need reshaping when damp
- Spot cleaned for minor soiling without wetting the entire piece
Cotton yarn wolves should be hand washed only. Wool yarn wolves should be hand washed in cool water with wool-specific detergent to prevent felting.
What to Make Next
If you enjoyed this wolf crochet pattern, the natural next project in your amigurumi journey is a companion piece — another animal with the same basic construction but slightly different shaping challenges.
Our amigurumi collection includes patterns for bears, foxes, rabbits, and dragons — each written to the same standard as this wolf crochet pattern, with full stitch counts, technique explanations, and video tutorial links.
If you are interested in expanding into blanket patterns, our signature flower bouquet blanket collection — featuring rose, carnation, and lily of valley designs — uses many of the same fundamental techniques as amigurumi but produces a dramatically larger, more complex finished piece. Many makers use their amigurumi skills as the foundation for advanced pattern work.
Summary: Wolf Crochet Pattern at a Glance
| Detail | Specification |
|---|---|
| Skill level | Beginner — intermediate |
| Hook size | 2.5mm or 3.0mm |
| Yarn weight | DK or sport weight |
| Yarn amount | MC: 80–100g / SC: 30–40g / AC: 10–15g |
| Safety eyes | 12mm black (2 pieces) |
| Finished size | 20–25cm seated (3.0mm hook) |
| Estimated time | 8–12 hours |
| Pattern type | Amigurumi — worked in continuous spiral |
Made this wolf? We would love to see it. Tag your finished project and leave a comment below — what color did you choose?